Teachers & Staff
Tech Info, Guides, and FAQs
- Technology Overview
- Technology Helpdesk - Submit a Ticket!
- Clearing Your Cache and Browsing Data in Chrome
- Document Cameras (IPEVO & Elmo)
- How to Clean Your Devices
- How to Manage Your Monitor and Projector
- How to Sign into Google
- MCAS
- Office 365 Information
- Phone & Voicemail
- Printing & Copiers
- Clever
Technology Overview
Welcome to Newburyport Public Schools!
Newburyport Public Schools is a Google for Education district. You have access to all of the tools provided in Google Workspace, including Gmail for your school email, Drive, Classroom, Meet, and many others. Whenever possible, you are encouraged to use these tools with staff and students.
Students all have access to Google Workspace as well, providing them with the same tools available to you, with some exceptions. For example, the district decided to not grant access to email for students in K-4th grade.
We use a Single Sign-On (SSO) service for school accounts, called Okta, which syncs usernames and passwords across multiple applications throughout the district. In effect, you have a single account for most services, with some exceptions.
Setting Up Your Account
After you arrive and get settled, please log into your new account. You will need to complete this process by signing in through our SSO: sso.newburyport.k12.ma.us
Typically, your username is your first initial and last name. For example, John Smith’s username would be jsmith. For your initial login, your temporary password is your username plus -01950. For example, John Smith's temporary password would be: jsmith-01950.
If you're having trouble logging in, you can submit a ticket through the NPS Technology Helpdesk or by emailing: support@newburyport.k12.ma.us
When you log in, you will see a message telling you to change your password. Please choose a password that is secure and unique. We recommend you use a password strength testing tool and check how long it would take to crack what you've chosen. Please note that your password must be longer than five characters.
After logging in, you will see a welcome message from our SSO portal that asks you to enter a secondary email and choose a security question and answer. Providing this information allows you to reset your password and unlock your account yourself. Your secondary email should be a personal account you have access to.
You will also be prompted to set up Multi-factor authentication (MFA) for your account. Instructions on setting up MFA can found on the following wiki page: How to Set Up Multi-Factor Authentication (MFA)
After you enter a secondary email, choose a security question, and set up MFA, click on Create My Account. Our SSO portal, Okta, will send you an email asking you to confirm your secondary email.
Next, you will be prompted by Google to agree to their terms & conditions for Google Workspace. Once you accept, you will be redirected to Google Drive.
Your account is now set up and ready to use.
Resetting Your Password
If you are unable to access your account after it's been setup, you can unlock it or reset your password from any web browser using our SSO portal. Instructions are located on the How To Reset Your School Account Password page.
Email and Mail Groups
Your email address begins with your username, and ends with the domain name @newburyport.k12.ma.us. For example, John Smith's address would be jsmith@newburyport.k12.ma.us.
Gmail is used for all district email accounts.
To simplify communication each school has its own Google mail group. To send an email to everyone in a building, address an email to the group and all will receive it. The groups are:
Bresnahan: ftbstaff@newburyport.k12.ma.us
Molin: upperele@newburyport.k12.ma.us
Nock: middle@newburyport.k12.ma.us
High: high@newburyport.k12.ma.us
Central Office: central@newburyport.k12.ma.us
These groups can be used by anyone with a district email account, but will ignore email from outside accounts. They will not work with personal email. There are many other groups created by teachers and staff that you can be invited to through Google Groups.
Every email account in the district is listed in contacts. If you start typing in the “To” box in Gmail, a search will begin. When you see the right account, click on the name and the “To” box will be filled in. To view all contacts, you can visit the Google Contacts page and click on 'Directory'.
Students are also present in contacts. To differentiate between students and teachers, student email addresses have a different domain name. Teacher and staff emails all end with @newburyport.k12.ma.us, while student emails all end with @newburyportschools.com. Student accounts also include their year of graduation. For example, if John Smith was a student, his account might look something like this: jsmith28@newburyportschools.com. When addressing emails, look out for the domain name and the grad year.
Aspen
Aspen is our Student Information System (SIS) from Follett School Solutions. You may hear staff refer to it by its old name, X2. For security purposes, Aspen usernames and passwords are maintained separately. There is no syncing between your Aspen account and your school account. Aspen usernames and passwords are given out separately.
We try to make your Aspen username identical to your school username, but this is not always possible. The initial password is usually identical to your Aspen username. To request your Aspen credentials, or for help logging in, please submit a ticket through the NPS Technology Helpdesk or by emailing: aspen@newburyport.k12.ma.us
When you first log into Aspen, it will make you create a new password. Please pay attention to the password requirements. You may also be asked to provide a contact email and a security question. This is used for resetting your password yourself. Information on resetting your Aspen password, or creating a new one, can be found in the Aspen section of this wiki: http://wiki.newburyport.k12.ma.us/books/aspen
Aspen is used by many schools, so you need to make sure you are logging into the one specifically for Newburyport. The correct link is: ma-newburyport.myfollett.com
If you need information on using Aspen, there is a 'Help' dropdown on each page. You can also visit Follett's page for Aspen tutorials, trainings, and videos.
How To Get Tech Help
We have an automated ticketing system that will contact everyone in the tech department to ensure the fastest service. Emailing a technician directly can result in delays if the tech is out of the office or working on another problem. To get help, please submit a ticket through our NPS Technology Helpdesk.
When submitting a ticket, please tell us what the issue is, being descriptive as possible. Include any error messages and any troubleshooting steps you might have performed. Also, include what room you are in and what time you are available for support. Submitting a ticket and then entering a parent meeting or leaving for a half day will result in the techs having to visit you more than once. To maximize our technician’s time, we try to prevent as many return trips as possible.
If you're submitting a ticket on behalf of a student, please include their name and username. We can't help if we don't know exactly who we're supposed to be helping. Since you submitted the ticket, we often will only be communicating with you. Please make sure you pass on any relevant information to the student in question.
We can often fix problems remotely, so even if you don’t see a technician, keep an eye out for emails and messages from the Helpdesk. They could be requests for more information, a request for you to perform a task such as rebooting the computer, or notification that your problem was solved.
If you need immediate support, our number is: 978-465-4440 ext. 4555. We do, however, recommend using our ticketing system in 99% of cases, as this will ensure the entire department sees your request and that it can be quickly directed to the right person. Often, the person you're calling for will not be at their desk, and submitting a ticket ensures they will see your request as soon as possible.
Technology Helpdesk - Submit a Ticket!
If you're having technology trouble, need support or repairs, or have a question, please visit our NPS Technology Helpdesk and submit a ticket.
Clearing Your Cache and Browsing Data in Chrome
Your browser cache works by saving files and settings for websites you visit. This increases the speed at which web pages load and makes your experience better, especially on websites you frequent. But, as your cache accumulates, outdated files and information can lead to issues.
Clearing your cache gives you a clean slate and is a good first step when troubleshooting browser issues.
Steps on clearing your browser cache and other browsing data in Google Chrome, can be found below:
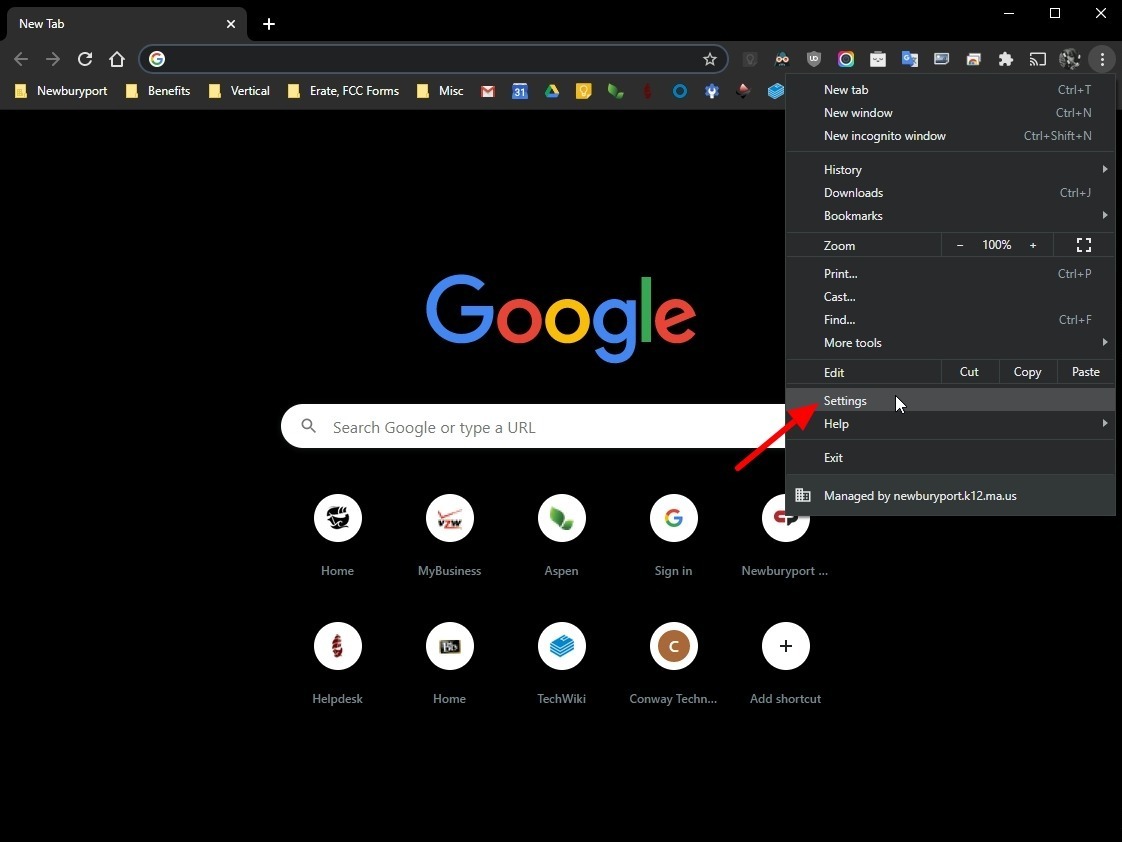
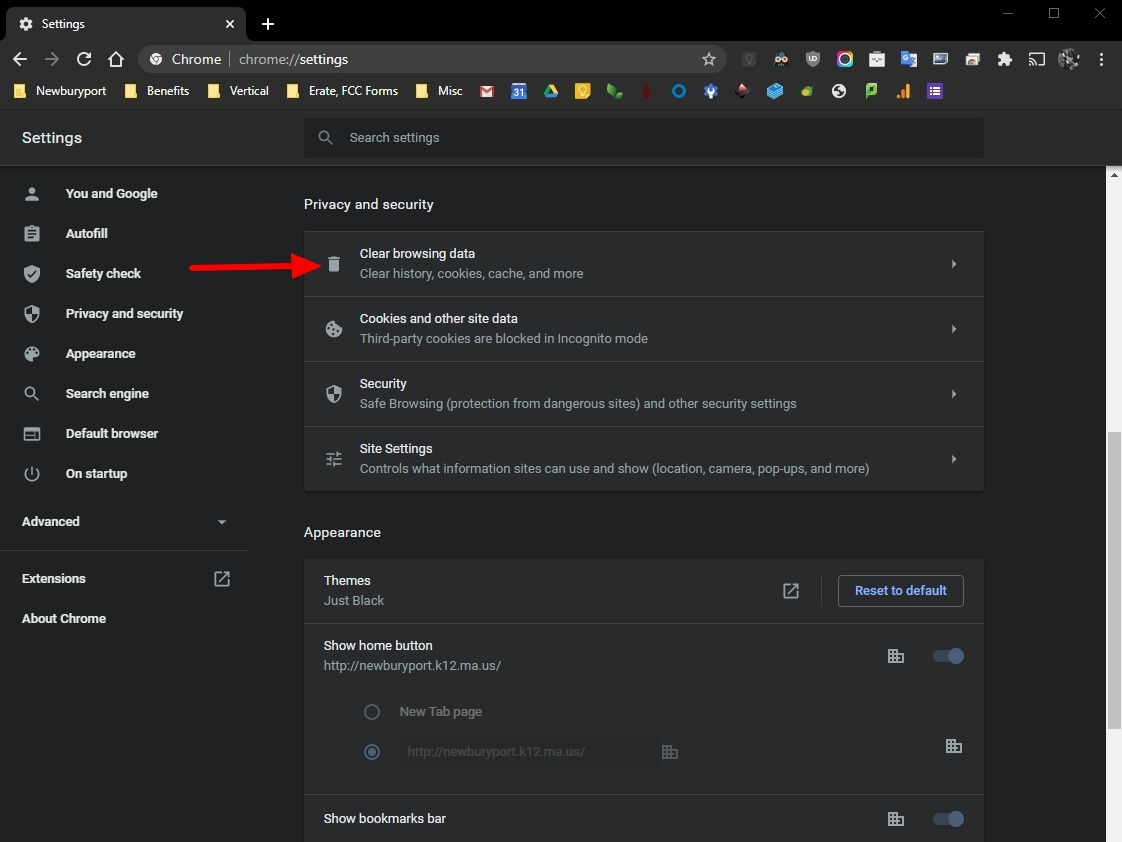
Open the Chrome web browser. In the top right, click on the three-dot menu icon.
A drop-down menu will appear. Click on the option near the bottom labeled Settings.
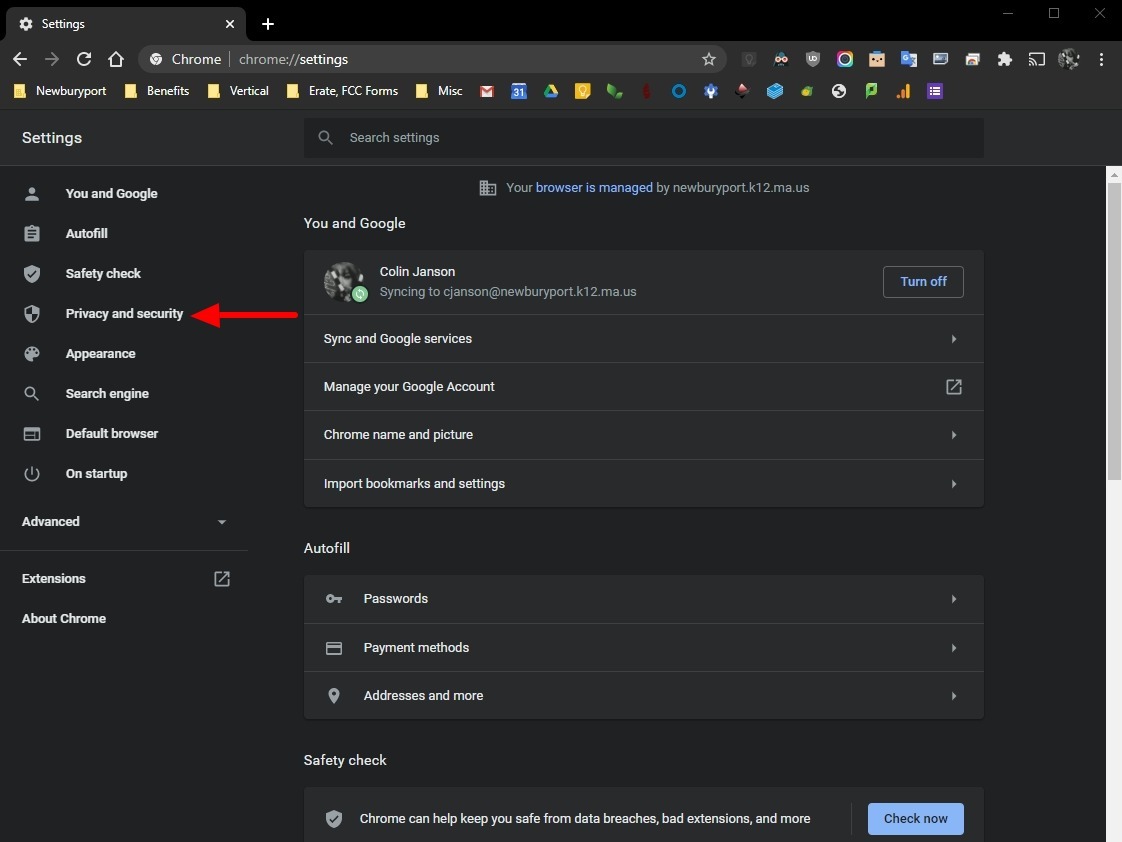
You are now at the privacy and security section of the settings page. Look for the top option, labeled Clear browsing data. Click on it to proceed.
A window will appear with options for clearing browser data.
By default, 'Time range' will be set to 'All time' and all the three options will be checked. You can uncheck browsing history if you'd like, but leave both cookies and cache checked if you've been experiencing issues.
Note: Clearing your cookies will sign you out of all websites. You will need to sign in again the next time you visit.
Now, click the Clear data button on the bottom right. This should only take a couple seconds, but may take longer if you have a large cache. Once Chrome has finished, it will let you know.
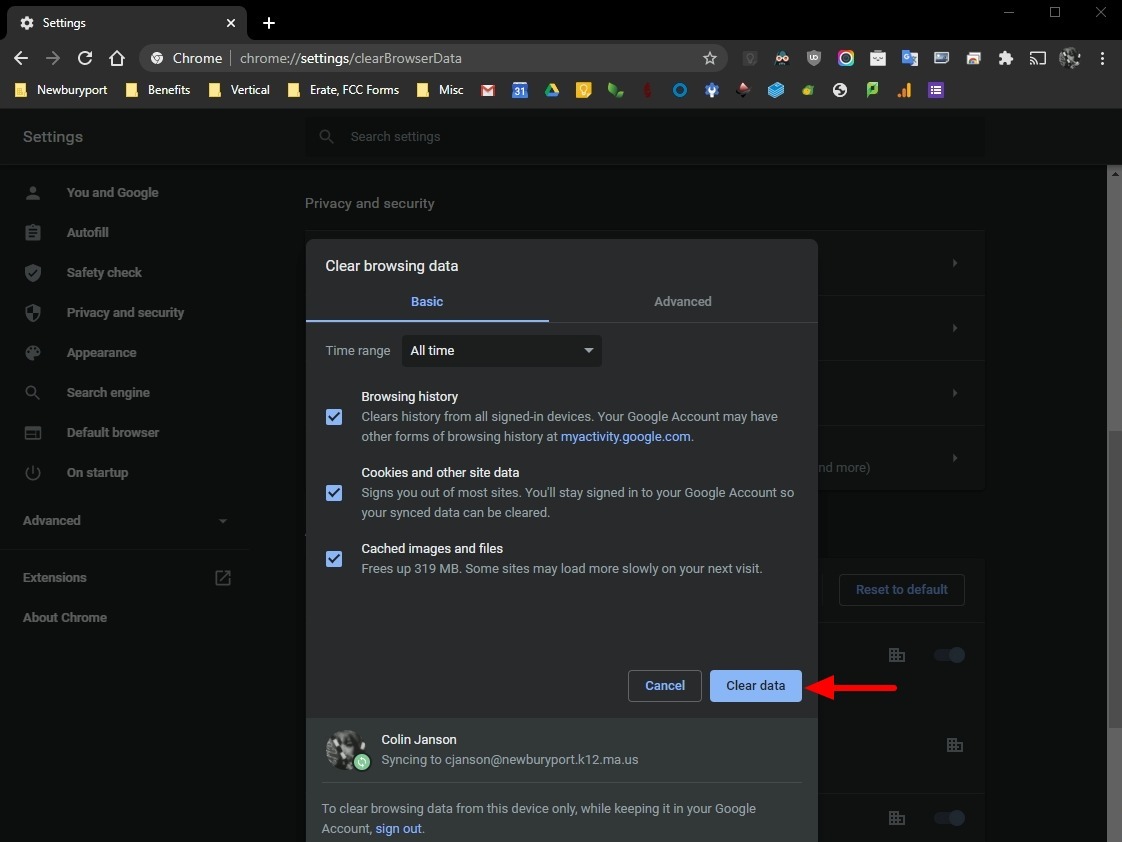
Your cache is now cleared!
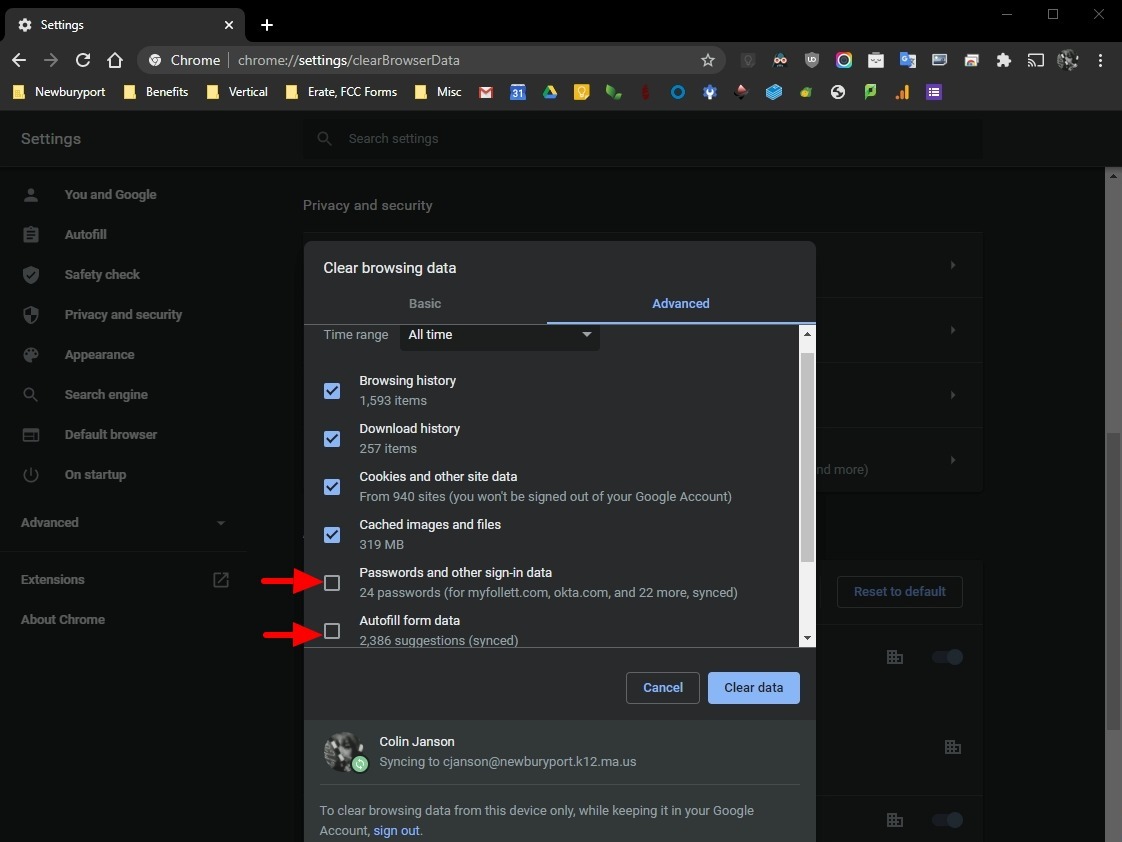
If you need to clear out other browsing data, or want to be more granular with what you're clearing, there are more options on the Advanced tab.
The Advanced tab will let you clear out passwords and sign-in data saved by the browser. This can be helpful if you're having trouble with Chrome auto-filling old passwords. You can also clear other auto-fill data, such as addresses and contact information.
Document Cameras (IPEVO & Elmo)
How to Use the IPEVO VZ-R Document Camera
Here is a YouTube video showing you how to use a IPEVO VZ-R Document Camera in your classroom:
IPEVO also has helpful information on their website. Visit the 'Do More' page for examples of how others have used their document cameras:
If you are looking for guides or manuals, they can be found on the IPEVO VZ-R support page:
How to Use Your Elmo
Here is a YouTube video showing you how to use your Elmo in your classroom:
.png)
How to Clean Your Devices
Cleaning your device
Cleaning your devices is simpler than you’d think. The most important thing to remember is you don’t want ANY liquid to get inside a laptop, keyboard, or device of any kind. Electricity and water are a bad combination. You should also NEVER use general purpose cleaning products on a monitor or screen.
- Turn off and unplug your chromebook, laptop or device.
- You can use any mild cleaning liquid you have on hand, but use common sense. Isopropyl alcohol, bleach or alcohol wipes, a mix of bleach and water, etc, are all okay to use.
- Wet a cloth with the cleaning liquid.
- Wring out the cloth until it’s damp, but not wet.
- Gently wipe down the exterior of your device. For example, for a chromebook or laptop, wipe down the case, keyboard, and touchpad. Avoid getting any of the cleaning liquid on the screen, but cleaning the bezel around your screen is fine.
Cleaning your monitor and screens
To clean the screen on your chromebook or laptop:
- There are many computer screen cleaners on the market, but warm water is usually all we use. You can prepare a solution that is one part dishwashing detergent with five parts water, if needed.
- Use a lint-free or microfiber cloth, and dampen it with water or the solution.
- Make sure it’s damp, but not wet. You don't want dripping.
- Wipe the screen down gently, ensuring you don’t scratch it.
- Follow with a dry, lint-free or microfiber cloth.
For screens on smartphones or tablets (such as iPads), you can use isopropyl alcohol or alcohol wipes. That's because these screens are made of glass. However, if you are unsure if your device has a glass screen, err on the side of caution and just use water.
How to Manage Your Monitor and Projector
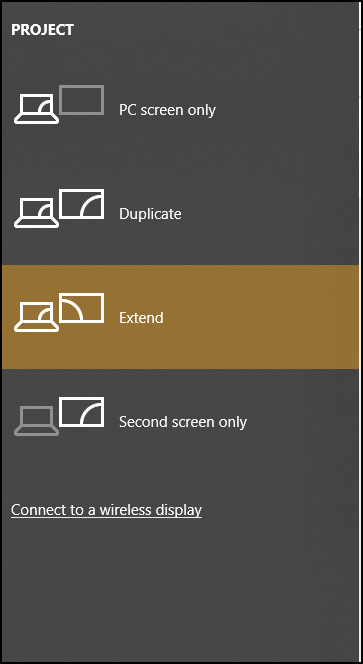
You have the option to use different display modes in your classroom. When doing so, your projector is treated and labeled as a screen. By default, your computer is set to Duplicate. This means whatever is on your desktop monitor will also be shown on your projector. If you prefer, you can switch to Extend, which allows your desktop monitor and projector to operate as connected, but independent, screens.
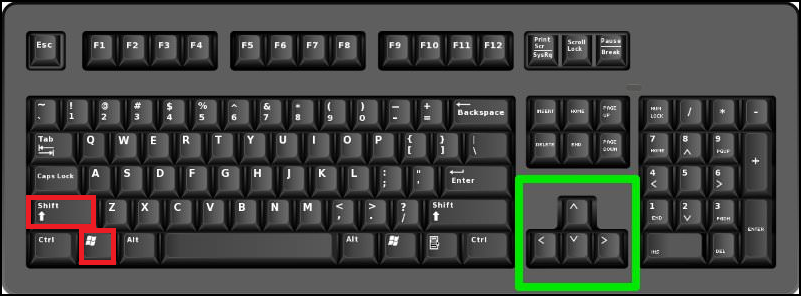
Press and hold the Windows Key + P

If you are using Extend and want to move a window to the other screen (e.g. from your desktop monitor to the projector) there are two ways to accomplish this. First, you can use your mouse. Click and hold on the window, and then drag it to the other screen. Second, you can use your keyboard. Press and hold the Windows Key + P and then use the arrow keys to shift the selected window to the other screen.
NOTE: When in Extend mode, the only way to run the Elmo software (Image Mate) in full screen on your projector is to first maximize it and then use Windows Key + P and the arrow keys to move it to the right display.
How to Sign into Google
We have a simple and easy to remember link that will log you into our single sign-on (SSO) and bring you directly to Google Drive.
Please go to: sso.newburyport.k12.ma.us
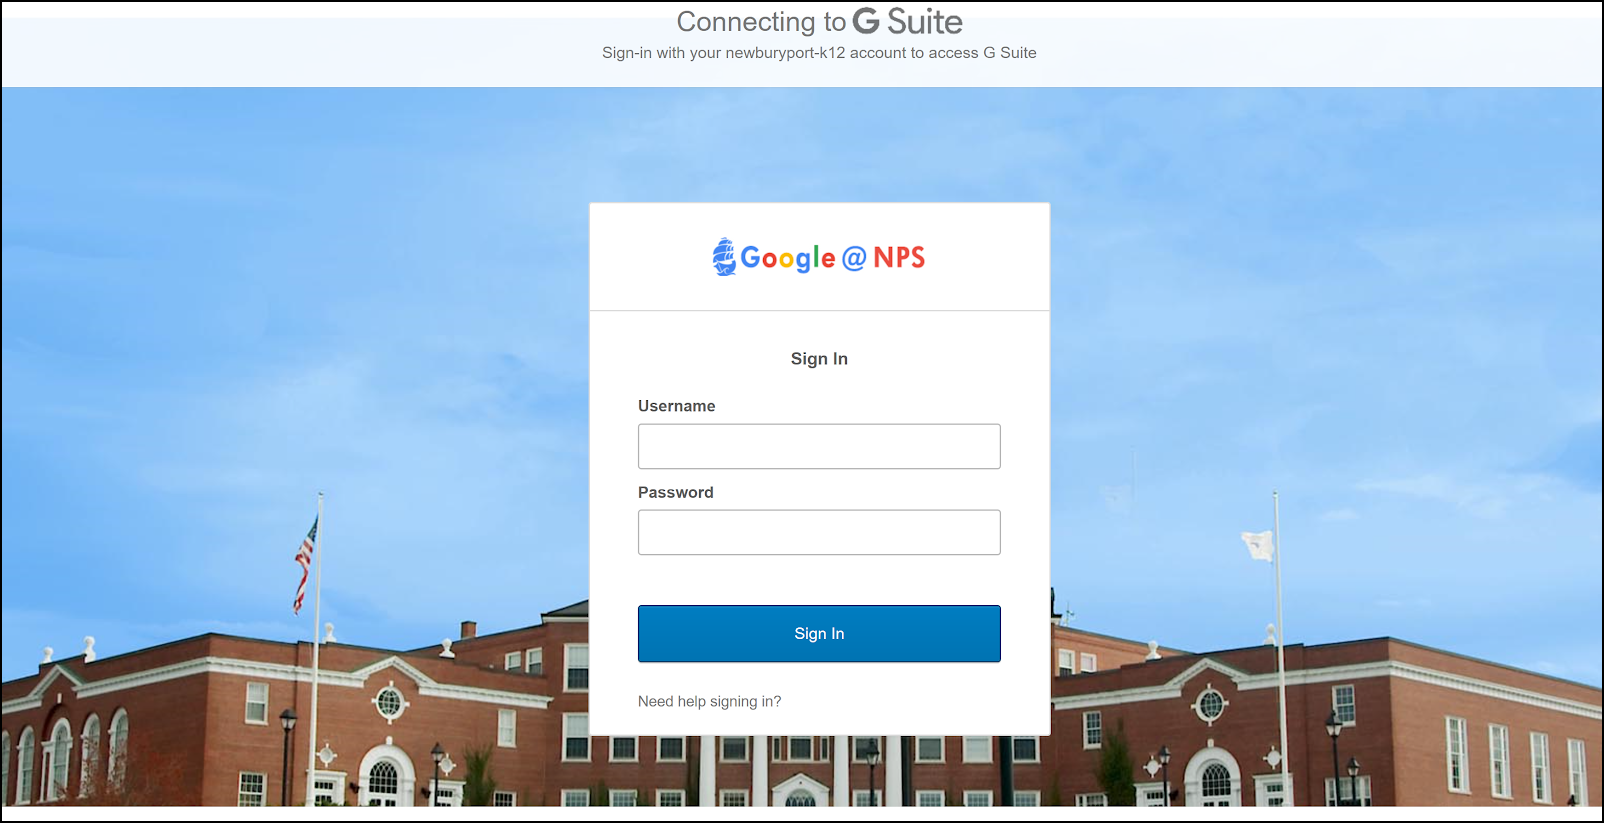
At the sign in screen, enter your Username (not your full email address) and Password.
For staff, your username is your first initial and last name (e.g. Jane Doe = jdoe). For students, your username is your first initial, last name, and year of graduation (e.g. Jane Doe, Class of 2021 = jdoe21).
If you've never logged into our SSO before, it will prompt you to enter a secondary email address and choose a security question. These are only used for resetting your password or making changes to your account.
If you've never signed into Google before, it will also prompt you to agree to Google's terms & conditions before you can continue.
After a successful login, you will be redirected to Google Drive. You can use the waffle menu in the top-right to access all the other Google applications.
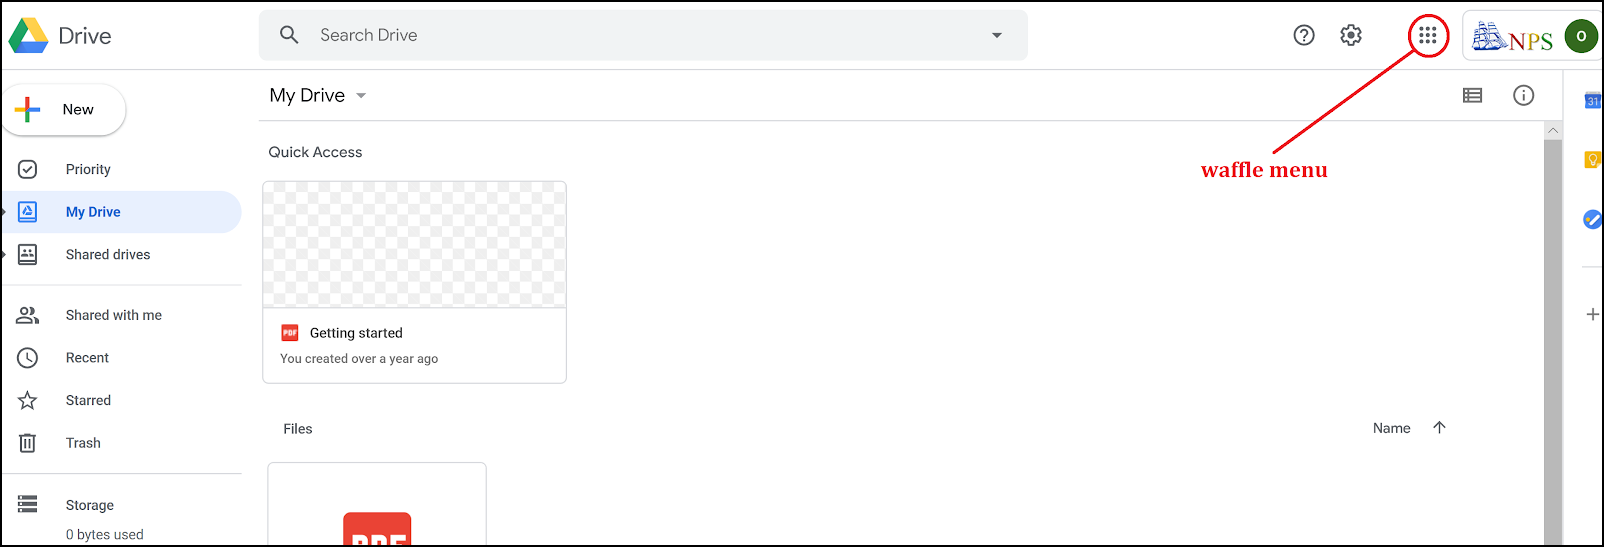
Note the slider to the right. Move the menu up and down using the slider so you can see all the applications.

Click on the application you'd like to use, and it will open in a new tab or window.
MCAS
MCAS information.
Student MCAS Sign In
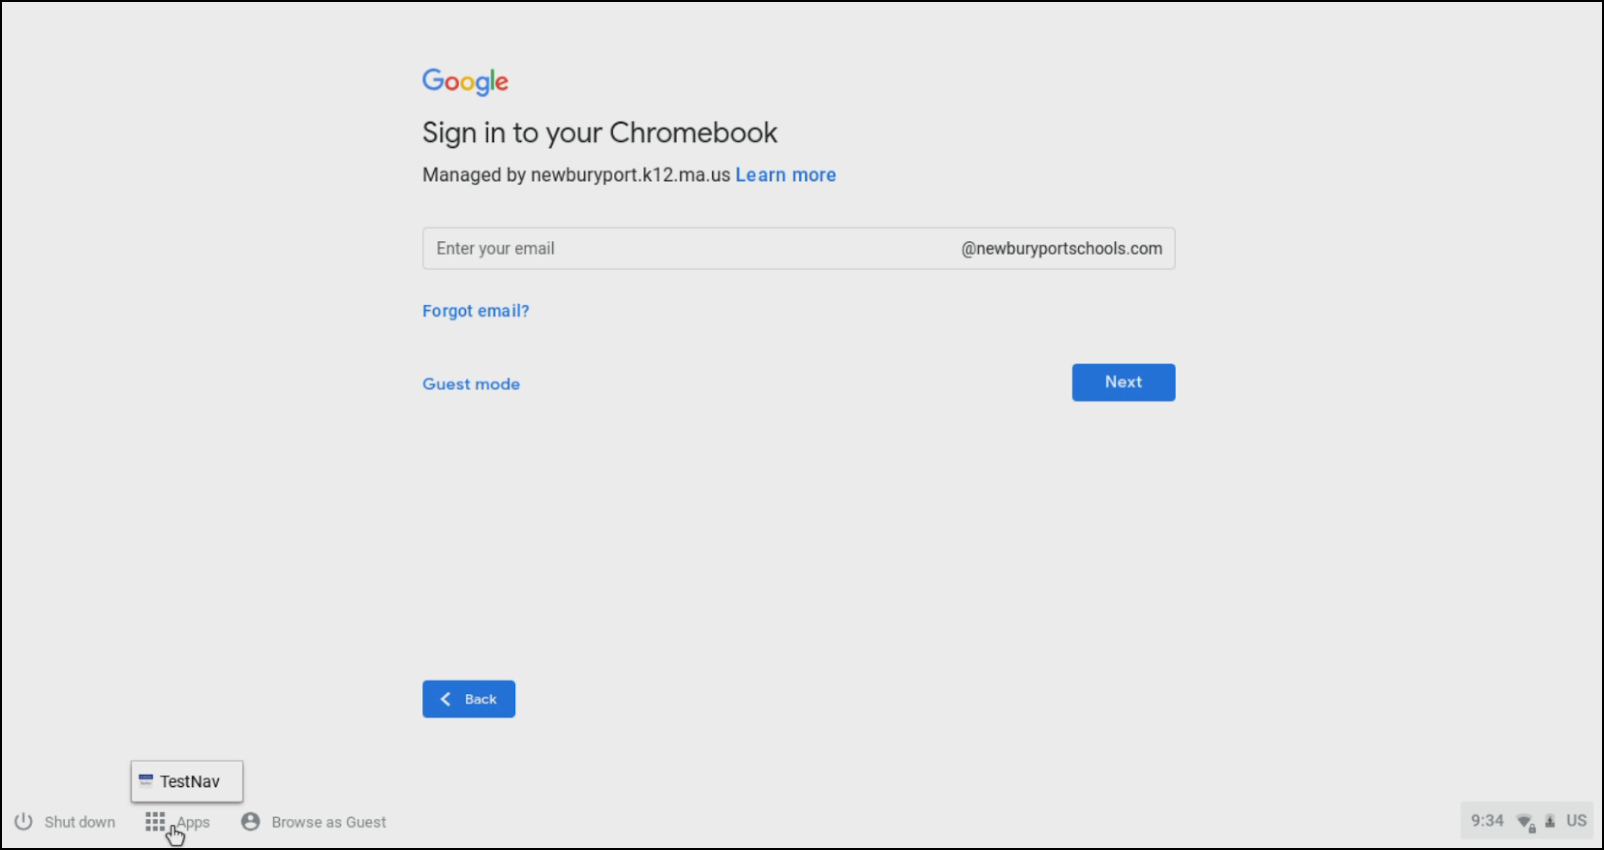
Turn on the student's Chromebook and wait for the login screen to load.
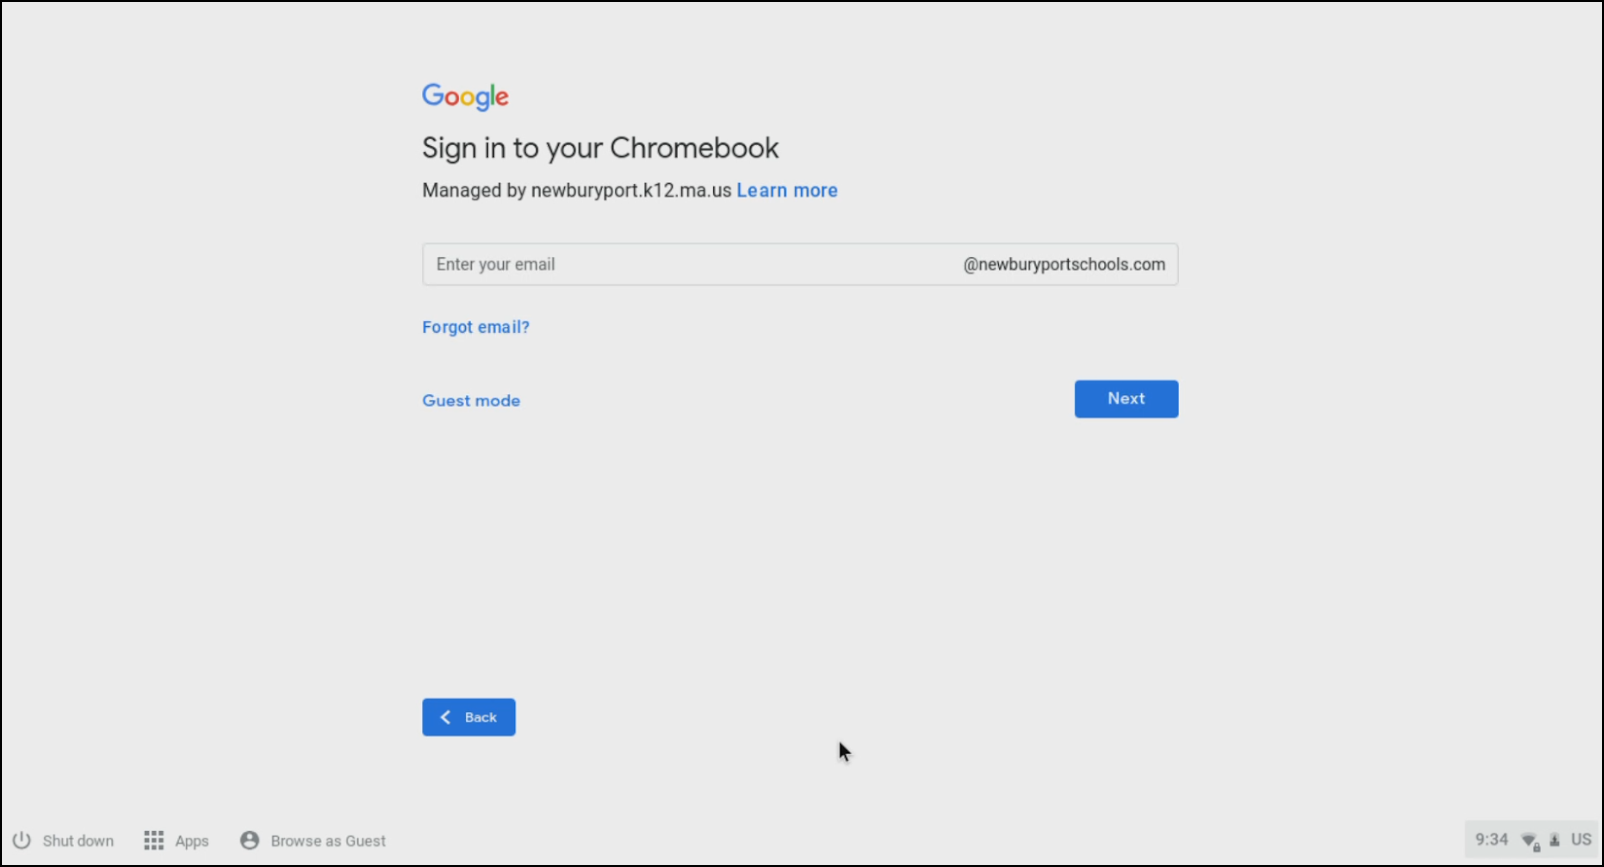
DO NOT SIGN INTO THE CHROMEBOOK!
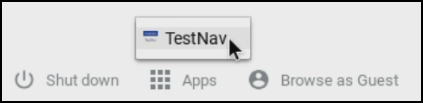
On the bottom left, select 'Apps'.
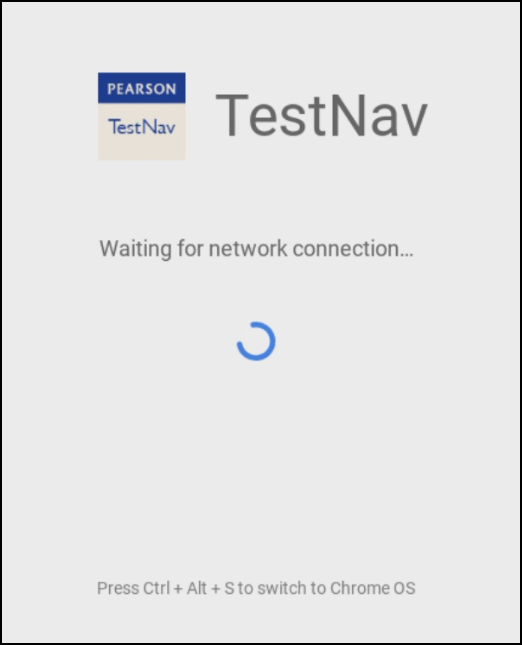
The first time TestNav loads it will ask what state you are in. Students seem to have trouble with this step and will select the wrong state. We are in Massachusetts.
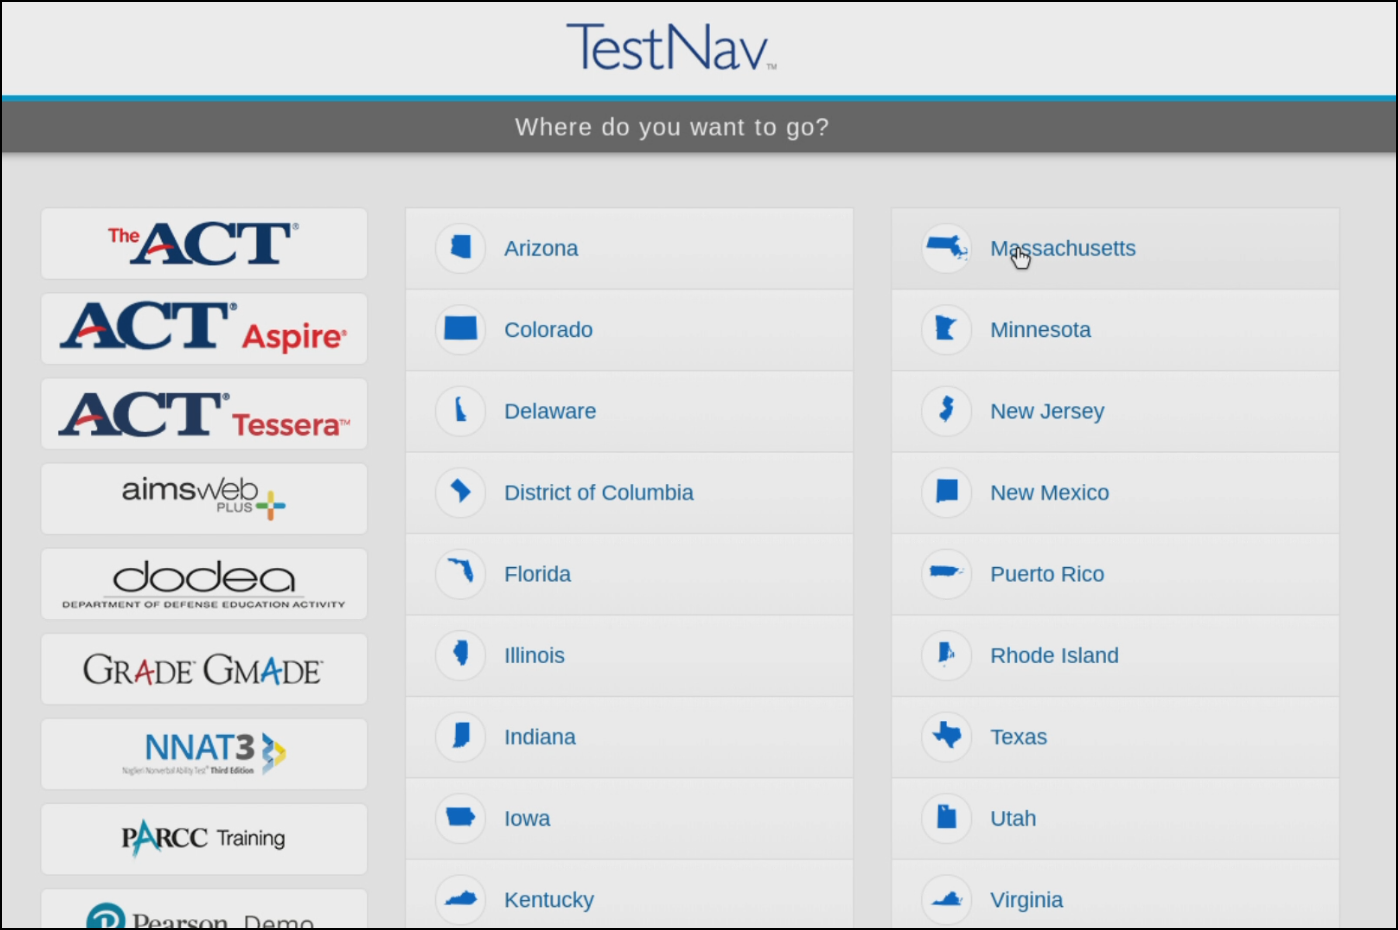
You will be brought to the sign in page. Students must use the username and password from their test ticket.
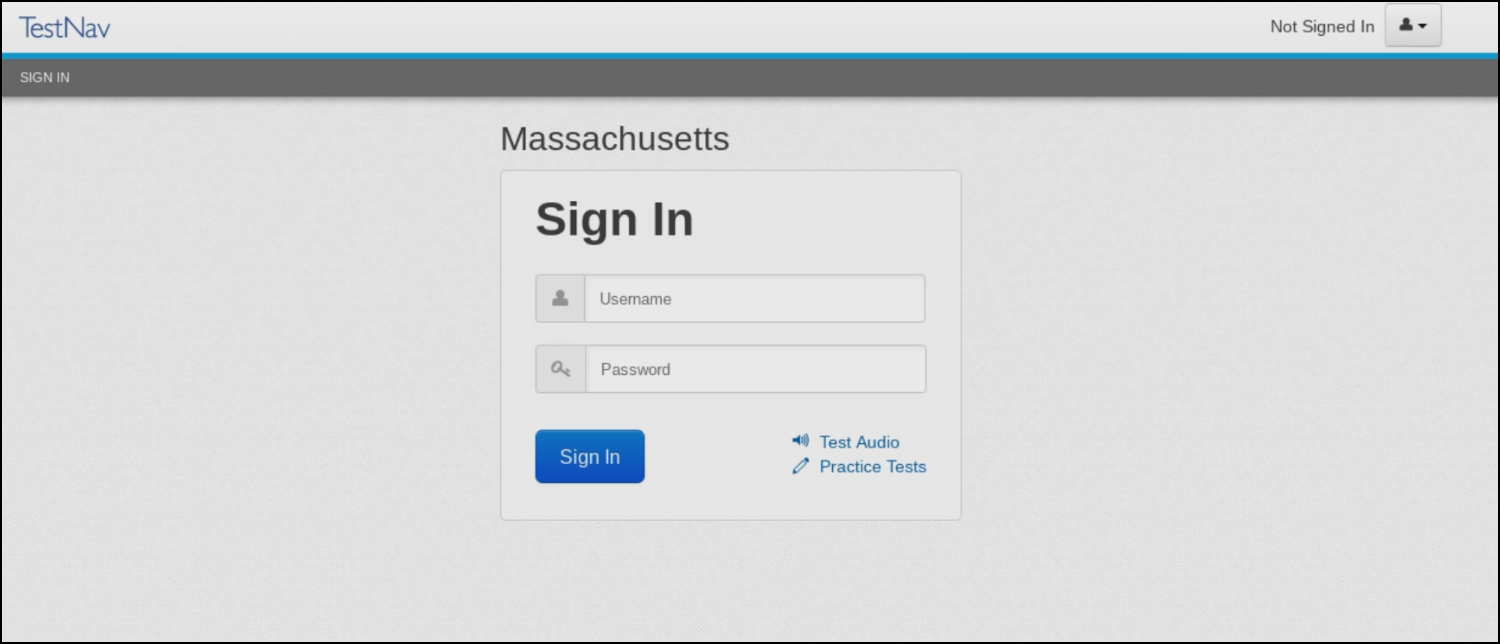
Note that it says Massachusetts above the 'Sign In' box.
If there's a different state or ACT listed, open the menu on the top right, click the down arrow next to the person icon, then click 'Choose a different customer'.

Make sure you select Massachusetts. You will then return to the sign in screen and the student can login using the information from the test ticket.
Office 365 Information
As a Google for Education district, we recommended using Google apps whenever possible. However, we have also setup Office 365 access for all staff and students.
This account will allow you to use Office 365 online tools not only on regular computers but also on devices without a standard OS like Chromebooks. It will also allow you to download and install it on your personal computers PC or MAC. To gain access go here;
https://login.microsoftonline.com/
Your username is the same one you use to login to your computers and email with the addition of @newburyport.onmicrosoft.com. Using my username as an example;
username: dskane@newburyport.onmicrosoft.com
The password is the same password you use to access your computers and email.
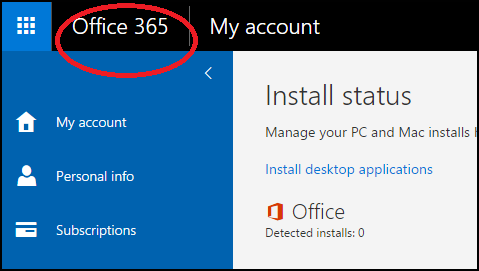
(if you land on your account page simply Click Office 365 on the top left)
After logging in you will see the landing page:
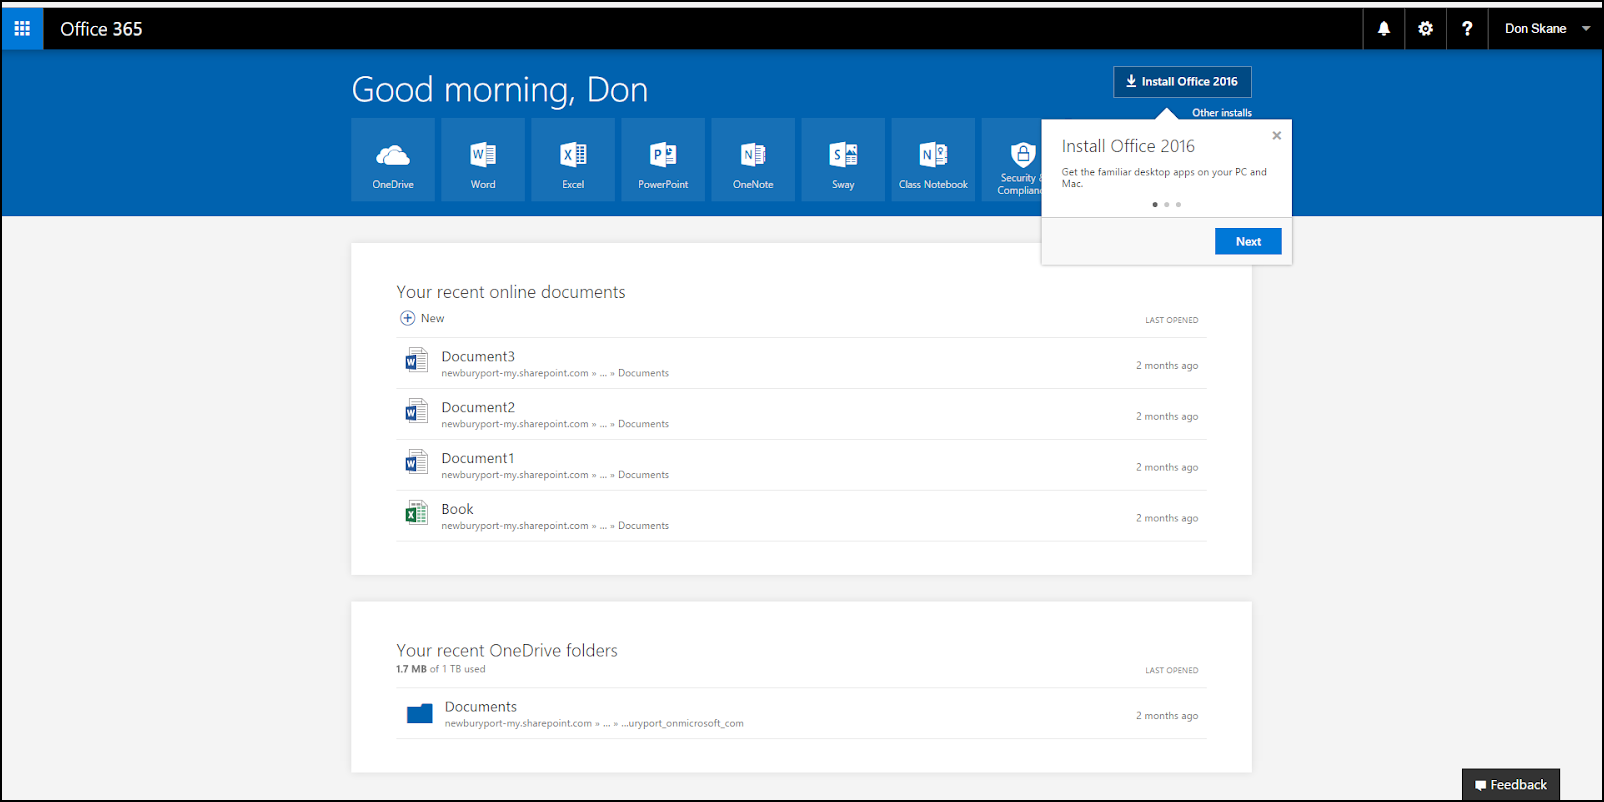
From here you can select the program you want to run right in your browser like Google Apps or if you are on your personal machine select Install Office 2016.
PLEASE DO NOT INSTALL OFFICE ON SCHOOL COMPUTERS
We are providing this access to give you as many tools as possible. We are NOT looking to replace Google Workspace.
Phone & Voicemail
Logging into Voicemail from Home (Central Office Only)
You can access your voicemail at home, or from any external phone.
To Access Voicemail from a Phone Outside of Our System
- Dial the main number for Central Office: (978) 465-4456
- Ignore the prompts and enter your four digit extension.
- Stay on the line and wait for it to ring and then go to voicemail.
- When you hear your own voicemail greeting, press 9.
- Enter your voicemail PIN/Password, then press #.
- You are now logged into your voicemail. Proceed to check your messages and/or change settings as you normally would.
Printing & Copiers
Information on printing, using the copiers, our print release system, and your FOB.
How to Associate Your Fob with the Copiers
We have installed fob readers that can associate your Newburyport door fob with your network account. This will allow you to use both your pin or your fob to log into the copiers. For this to work you will need to perform the following steps one time on ANY copier. Once done you will be able to use your fob on any copier in the district.
Step 1
Walk up to the copier and ensure it is at the login screen. Place your fob near the blue box on the front.
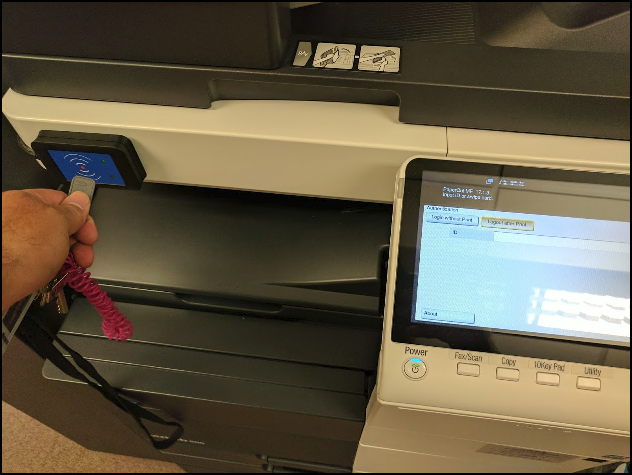
Step 2
Notice the screen will now ask for your USERNAME and PASSWORD.
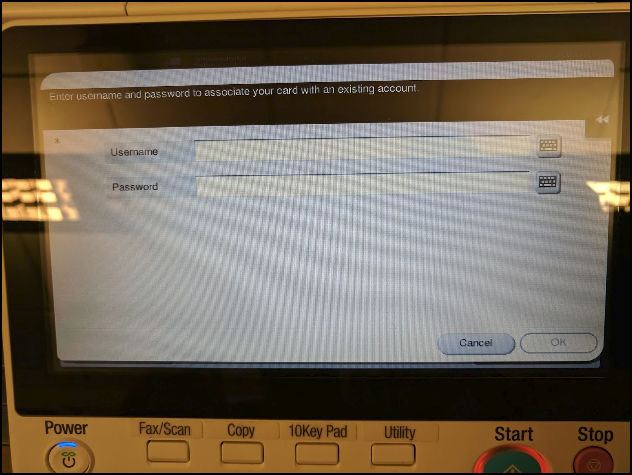
Step 3
Enter the same USERNAME and PASSWORD you use everyday to access your computer.
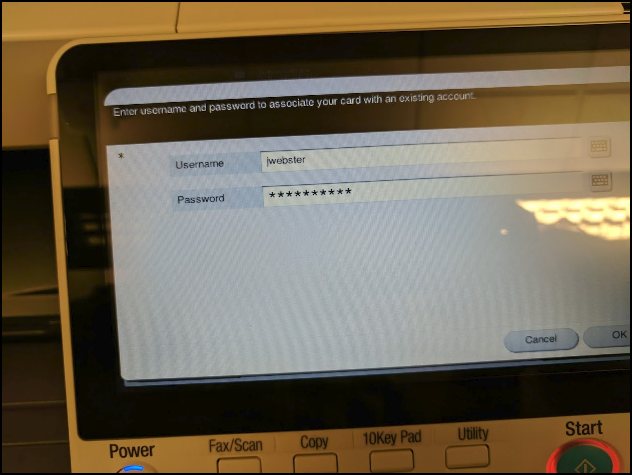
Step 4
If you have done this correctly you will be brought to function screen and you are all done.
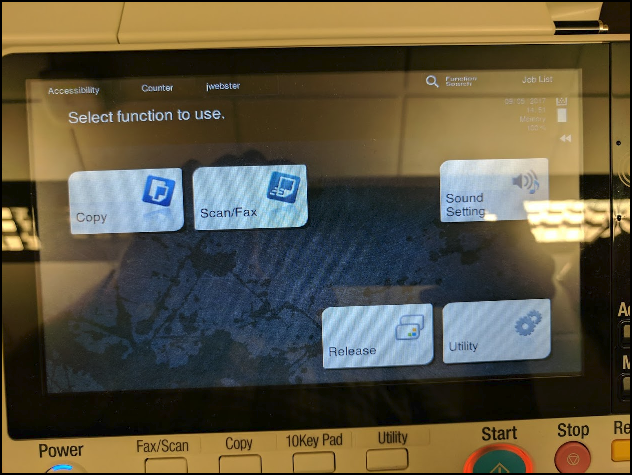
Troubleshooting
If you receive any error please cancel the attempt and then start over from Step 1.
How to Print From PaperCut Mobility Print
If you are logged in on a Chromebook with your district account, hit print and select NPS-Konica as your destination.

If you are on a personal device, please follow the below link while connected to the guest network, and follow the appropriate instructions for your type of device.
Clever
Information on using Clever.
Clever Training for Teachers
Stacey Boucher has created a Google Slides presentation on using Clever as a teacher: